Monday, February 27, 2012

One Man's Trash is Another Man's Treasure

I got lucky today.  Real lucky.

I scored an awesome piece of furniture for FREE from the side of the road.

You know why else I'm lucky?  My parents (of where I had just dropped Gus off for his play date), dropped everything and came with their big ol' hunka car to pick it up for me so I wasn't late for work.  My mom and dad (rocking his work suit b-t-dubs) loaded the ginormous (FREE) dresser into the car for me because they love me.

Check it out!


My parents thought it looked so good that they were almost too afraid to just take it, so my mom, being just as cute as she can be, went and rang the doorbell to ask permission to take it.   She got a resounding "YES!"

When I got home from work, we unloaded it for storage in the basement.  This time I was in MY work clothes - minus the heels.  I rocked my pink converse that were still in my closet from high school.  A modern day "working girl" style if you will in order to avoid injuries.  The rule for transporting this dresser is to do it in your nicest garb.  Remember that.  It's super important.

The dresser already looks pretty good, minus a few scratches, but I plan on painting it a fresh new color anyway since black isn't really my style.  I plan to use it in my studio-to-be as super duper craft supply storage.  PLUS the top will provide an extra nice amount of space to spread out my life (a.k.a. mess) while I work.

It doesn't get much better than this!

{Gus Butt!}


Have you ever scored something completely awesome from the side of the road or somewhere else completely random?  I'd love to hear about it!

Oh, and since we were talking about the Gus-mister (and his play date Irie).  Here they are in all their cuteness for your viewing pleasure.  Feel free to let out a good long "awwwwww."

Friday, February 24, 2012

Feature Friday


It's Friday again!  What a whirlwind of a week.  It has been quite busy at work and I have begun packing up my life at home, but it's always good news to hear that it's Friday!

Friday means casual day at work (which equals cute boots and jeans), and best of all, the beginning to a weekend of sleep, family and projects.

B-T-Dubs, I apologize for my lack of posts this week.  My blogger has been acting strange and hasn't been letting me submit anything.  It's been day after day of opening up a new post document and seeing the gray circle of death.  I'm hoping that doesn't continue.

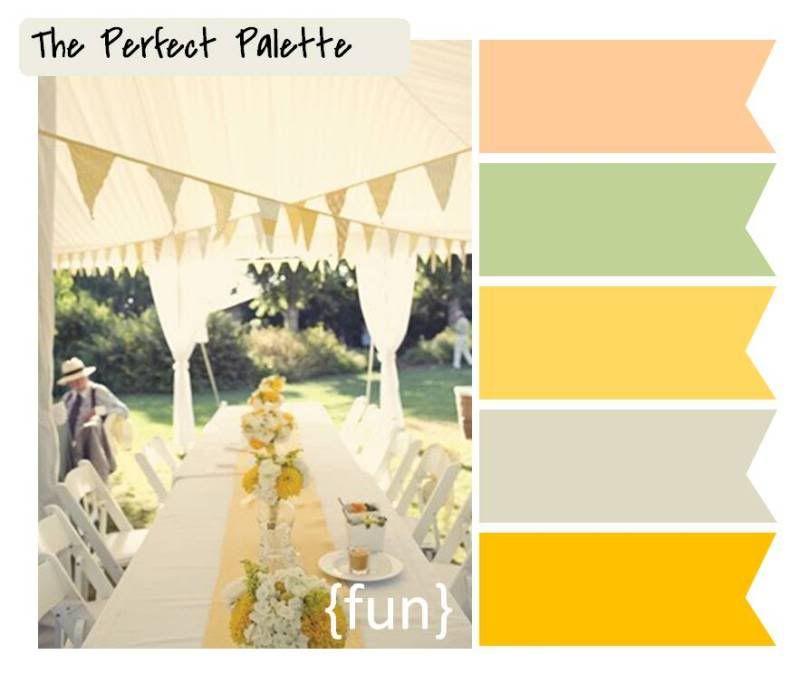
I have been thinking a lot about color palettes lately.  Last night, I just had to stop at Home Depot to pick up a way too large stack of paint chips so I could begin visually scheming my future rooms.  I have pretty well decided on a palette for the kitchen and I decided to share some color boards that pretty well sum it up for this Friday's Feature. 


{Peach, Mint, Lemon, Taupe and Mustard.  Found at The Perfect Palette}

{Lemon and Mint - plus color coordinating cockatils.  Found at Martha Stewart Weddings}

Pinned Image
{Mint, Celedon and Saffron.  Found at Flights of Fancy}

Pinned Image
{Mint, Coral and Ivory.  Found at The Southern Weddings}

Pinned Image
{Mint with a splash of gold and ivory. Found on Weddingish}

Turns out, most of my kitchen things (and some cans of paint I just happen to have laying around) fall into these categories of color, I will just be representing the bigger picture of what I own in a different way because I can.  What a beautiful feeling.

Wednesday, February 22, 2012

Up and coming!

What do muddy heels say about a girl?  Look good, play good?  Classy AND adventurous? 


Well, mine (that I keep forgetting to clean and have been wearing anyway so they're about to the point of cleaning themselves), say that a. it's raining a lot in Ohio and b.  my house looks like a house and i just had to climb in the mud so I could see every knook and cranny of it.  Yup, that's me.
But seriously, check it out!

Now can you see why I need heels?


I've been slacking in the picture updating department as of late, but it's been hard to keep up with as fast as the house has been developing!  That being said, I have a really nice series of picture updates to share.


Once we received notification that the foundation had finished drying, I had to head over as soon as possible to see what was happening.  My Dad and I grabbed some subs for lunch and picnic'd in front of this beautiful display of wood.
2 days later (no exagerrating here), it looked like this:

The next time we went just another couple days later, it looked like this:

And now, it looks like this!


We can literally walk around inside our house and are able to tell which room is which.  Crazy town!  Who woulda thunk it!

Friday, February 17, 2012

Feature Friday

Happy Friday!  We made it!  And you know what that means.....


Here are some things that made me smile this week.

Paint Chip Art.  A fun, easy and CHEAP way to bring some color to your home.

6
{Pixelated Paint Chip Art by A Beautiful Mess - Extra Points for adding a cute phrase!}

{Ombre Herringbone Paint Chip Art by Elementary Home}

{Scale-like paint chip art as seen on Tatertots and Jello}

{Easy DIY Modular Storage as seen on Poppytalk}

I've also developed a "thing" for succulents.  I want this beautiful display in my garden.

Pinned Image
{Succulent Brick Wall display as found in the Design Sponge book and featured at Brooklyn Bride}

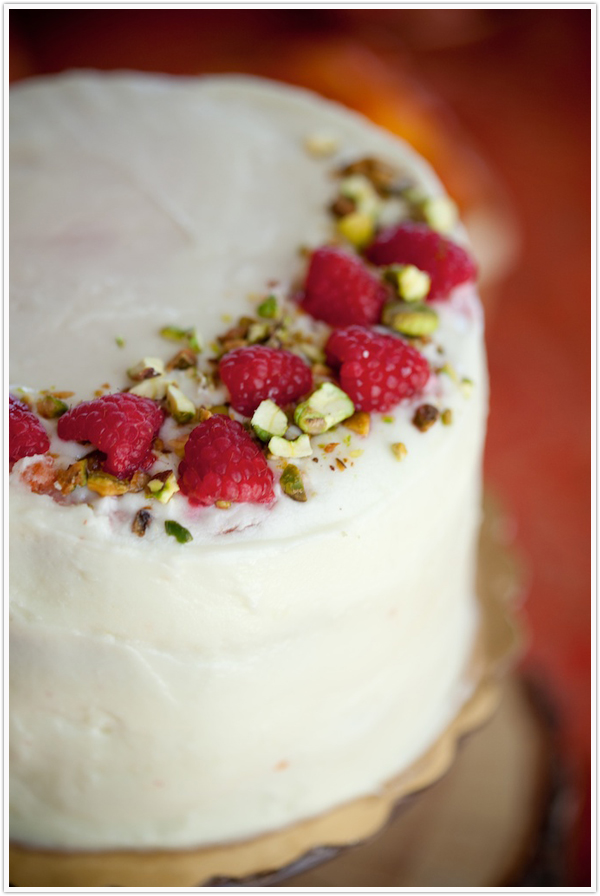
Ben is starting to get mad about all the sweets I make.  The are becoming  increasingly more hazardous as we watch our once slender physique develop unusual swelling in all the wrong places.   But seriously.  Look at this cake.  How can I not?

Raspberry_Pistachio_Cake_Recipe
{I need an excuse to make this Raspberry and Pistachio Cake as seen on Camille Styles.} 

Thanks for stopping by!  I hope you have a fun and relaxing weekend! 

Thursday, February 16, 2012

Every Day I Love You

I make most of my gifts.  Part of it is because I can generally save money by doing it myself, but most of it is because I delight in spending the time to create something meant for someone.  I hope people enjoy receiving my handmade gifts as much as I enjoy pouring myself into them. 

Since Ben and I are on a tight budget, as most newlyweds are, I have anxiously been awaiting the excuse to make this canvas for him.  Being that the phrase I wanted to put on the canvas was "Every Day I Love You,"  Valentine's day was the perfect occasion to give such a gift. 

I'm super excited about the way it turned out and can't wait to hang it in our new house!

Sorry about the funny glare.  I break the rules and take my pictures in the evening since it's dark when I go to work and almost dark when I get home.  Someday, I will learn better.  Oh, these winter days.

Now, I'm going to teach you how to make your own.  I was inspired by this art print at Modern Chic Home by Sugarboo Designs that is being sold for $250.  I don't know about you, but I don't have an extra $250 just lying around, so making this beautifully inspiring piece of artwork was my only option.  When daydreaming about it, I also envisioned it larger and in charger, with a slightly different color pallette, and slightly different framing of the message.

What you'll need:

-  Blank Canvas (I used size 18x22)
-  Mod Podge
-  Newspaper or phone book pages
-  Letter Stencils (I used these)
-  Paint Brush
-  Paint for the canvas in your color of choice (I used white)
-  Paint for the lettering in your color of choice (I used Rub 'n Buff Metallic Finishes in Antique Gold for a cheaper gold leaf look)

This will be the easiest decoupage project you will ever do.  You can literally slop it on without worry of smoothing it out.  {If you don't want the added texture, you can skip this step or use a bone folder to smooth so you can still see some print through your paint.}  Once the mod podge dries, paint over it with your white paint.  Put on a thick coat because you want some of the newspaper to show through, just not enough that you can tell it's newspaper underneath. 
Once your paint has dried (If your super impatient like me, you've taken a blow dryer to it to speed up the process), figure out where you want your wording to go.  I did mine toward the top left hand corner straight down from the side.  Arrange your stencils letter by letter and fill in using your finger and Rub N' Buff Metallic Finish, or a brush and the paint of your choice.

You can fill in the stencil marks if you wish, but I really liked the stencil look, so I kept it that way.

Allow to dry and stand back to look at your masterpiece.  Hang it somewhere special to share your special words with all the special people you invite into your home.

Wednesday, February 15, 2012

Arroz con Pollo

I'll be honest.  I didn't decide on what to make for Valentines Day dinner until about 2:00 the day of.  I was about to give up and make peanut butter and jelly, when I stumbled upon this recipe at my all time favorite cooking blog, Joy the Baker.  She is amazing and you should always always read her posts.


Joy described this as a romantic meal for two, and I'm not going to lie, I kind of doubted the romance of what is essentially chicken and rice, but it sounded good, so I went for it.

I will never subtly doubt Joy again!  She was right.  Arroz con Pollo is sexy food. 

It's not sequins and red lips sexy.  It's tight jeans, heels and a tank sexy.  It's casual tousled hair and lipgloss sexy. 

I'm pretty sure Ben fell in love with me all over again once he took his first bite.  Want someone to fall in love with you?  Make them Arroz con Pollo, then send them along with the leftovers.  It will work. 

As many good things do, start with wine and add a pinch of Saffron.
Use cheap wine because Saffron?  Not so cheap.  Joy's blog noted this as the case, however, being a first time Saffron buyer, I was shocked at this expensive little spice.  It took me a moment to wrap my head around the cost of Saffron until I though of the cost to eat this meal at a restaurant.  My panic attack subsoded when I came to the conclusion that I was still getting the better deal.  Phew!

Next, prep the chicken.
Saute the chopped onion and minced garlic together in the same pot as you fried your chicken until the onions are soft.
Add the tomatoes, bay leaf, salt, pepper and saffron wine.  Simmer for about 10 minutes or until the mixture is reduced by half.  Then add the rice, chicken stock and chicken pieces.  Simmer covered for 30-40 minutes.
Serve and enjoy!  I'm telling you, when you're done with your first plate, you'll be looking forward to your leftovers!


Arroz con Pollo
Dinner for Two, Leftovers for Two
From Joy the Baker, adapted from Martha Stewart
makes 4 pieces of chicken


Ingredients:

3/4 cup dry white wine
pinch of saffron threads (just a few strands is plenty)
4 chicken thighs (skin on)
salt and pepper for seasoning chicken
3 tablespoons olive oil
1 small onion, diced
2 cloves garlic, minced
1- 14.5 ounce can diced tomatoes (mostly drained)
1 bay leaf
1 1/2 teaspoons salt (or to taste)
1 teaspoon coarse ground black pepper
2 1/4 cups chicken broth (you may need a bit more)
1 1/2 cups white rice
scant 1 cup large green pimento olives ( I left these out since olives repulse me)

Combine wine and saffron in a small bowl.  The saffron will begin to breed yellow.  Great!  Set aside.
In a large, heavy-bottom saucepan or dutch oven, heat olive oil over medium heat.  Season both sides of the chicken generously with salt and pepper.

Place chicken pieces, skin side down, in the hot oil.  Allow to crisp and fry for 4 to 5 minutes.  Flip over and cook for another 2 minutes.  Remove the chicken pieces from the hot pan and place on a clean plate.

Add onions and garlic to the pan.  Cook, stirring, until soft and tender, about 10 minutes. Add the partially drained can of tomatoes, bay leaf,  salt and pepper, and saffron wine.  Allow to simmer, uncovered, until the mixture has reduced by half, about 10-15 minutes.

Add the rice to the pot.  Add the chicken broth and chicken pieces.  Top with olives (if you're using them).  Reduce the heat to low, place the lid on the pot, and allow to simmer until rice is tender and liquid is absorbed, about 30-40 minutes.

* Joy notes that there are a few tricks.  If you’re using a large pot, make sure that you move it around on the burner so that the simmer hits every part of the pan.  Fifteen minutes in the center of the pot.  Ten minutes on one side of the pot.  Ten minutes on the other side of the pot.  Sometimes pockets of rice can remain uncooked if the pan is too large.  Also, don’t be afraid to add a touch more broth if your rice isn’t cooking up.  No worries.  Keep it easy.

Check the rice after 30 minutes to make sure that it is cooking evenly.  Add more broth, a cup at a time, if necessary.

Once cooked, allow to rest for 10 minutes with the lid on.

Serve warm.

Dish will last, in a container in the fridge, for up to 3 or 4 days.

Tuesday, February 14, 2012

Fax Me!

Happy Valentines Day everyone!  I hope you are enjoying a day with your sweetie with lots of sweets!  Or at least having lots of sweets (and maybe a couple of cosmos)! 

Speaking of sweets.  Does anyone know if the candy conversation hearts still have one that says "fax me?"  It may be obsolete, but it would make me kind of sad if it wasn't in there.

Anywho.  Just for fun, I thought I would share a short picture progression of my last 4 years with my own sweetie. 

Dating: February 16, 2008 - April 5, 2010


Engagement:  April 5,2010 - October 22, 2010


Almost Married:  October 21, 2010


Matrimony: October 22, 2010


One Year Later:  October 22, 2010 - February 14, 2012


Love to everyone on this lovely day!

Monday, February 13, 2012

Re-vamp your wood floor

I thought I would offer you all something a little different today.  As I have previously mentioned, my in-laws are on a journey to move out to Ohio (cue the trumpets!).  Recently, they have been slaving away attempting to stage their current home in New England for selling and tackled a project on their floors that turned out beautifully. 

As you will learn quickly, this isn't a project for the faint of heart, but check out the results!


I would say this is well worth the time and effort put into it.  What better way to enter a home than to be greeted by the sparkling newness of vintage wood flooring.

With that, I bring you the first guest post at A Fraying Memoir from my father in law, Ron Kochanowski:

Weekend Floor Redo

Hello to all of you readers of A Fraying Memoir, it's an honor to be asked to be a guest poster here!  It probably wouldn't have happened though, if I weren't her father-in-law.  Need I say that I'm blessed to have a son with such good taste?

Several years ago, on one of the many trips that we made driving from Massachusetts to Cedarville, OH while Ben was in school, Lynn and I had a conversation that went something like this:
Lynn: I think that we should move to Columbus.
Ron: What? Why?
Lynn: It's obvious to me that Ben and Ashley are going to get married.  And Ashley being as close to her family as she is and being from Columbus, well, when they get married that's where they're going to live.
Ron: So, what happens when Sara [our daughter] gets married?

Little did I realize how that conversation would come to pass some four years later, except for the Sara part.  So, during the past year I've been working at transitioning positions from Business Manager to Software Consultant.  On January 3, 2012 that was completed.  The company that I am now working for actually wants me to live in Ohio.  So, as one thing leads to another, we began the process of earnestly preparing our home for the market.

One of the largest jobs that we've had to accomplish is to strip and refinish the hardwood floors in our living room, dining room, and hall.  These are the steps that were taken to bring a new sheen to 85-year-old wood.

This first step only applies if you have 4-legged pets: find a new home for them for the weekend.  Yes, this is a 3-day job.  Don't kid yourself into thinking that you can do it quicker.  And once you start putting down the new finish, you don't want paw prints showing when it dries.  So, get rid of the animals.  Lynn went to see her brother for the weekend in (coincidentally) Cedarville, MA.

Need I state the obvious?  Next you have to clear out the rooms or spaces that are to get refinished.  We took all of our living room furniture and put it in Sara's bedroom, and all of the dining room furniture went onto the back porch.  That left just Lynn sitting on the bare floor Friday night, but it was a fitting end to the first day!


Saturday morning, with coffee in one hand, waving good-bye to Lynn, Stanford and Delaney with the other, I began to do the real work.  A trip to the professionals at Home Depot set me up with all of the materials that I'd need: The sander (or Beast as Ben called it) was supposed to take the old finish off down to reveal what would look like new flooring, buffing pads, sand paper in 60 and 120 grits, 4 sheets of each, and a polyurethane application kit which contains one lambs wool applicator pad and a mounting head for the pad, one can of mineral spirits for clean-up, and finally, the polyurethane.


A word on polyurethane.  There are two types, oil-based and water-based.  The water-based finish seems to be more of a topcoat.  It dries much quicker, which means that you can get three coats done in one day, and be finished.  The oil-based finish interacts with the wood better.  The oils penetrate and bring out the patina of the wood better.  It takes three times longer to dry and greatly extends the time needed to complete the project.  Normally you would plan to apply 3 coats of the finish, but I found that Minwax makes a 2 coat, oil-based product and went with that because I wanted to enhance the patina of the wood and needed the project to fit within the time constraint of the weekend.

Back at home, everything that might be susceptible to dust needs to get covered.  Pull out the sheets and start tucking in what's left standing.  I put one covering the entryway into the kitchen, because Lynn told me to and I really didn't want to have to re-clean the kitchen.

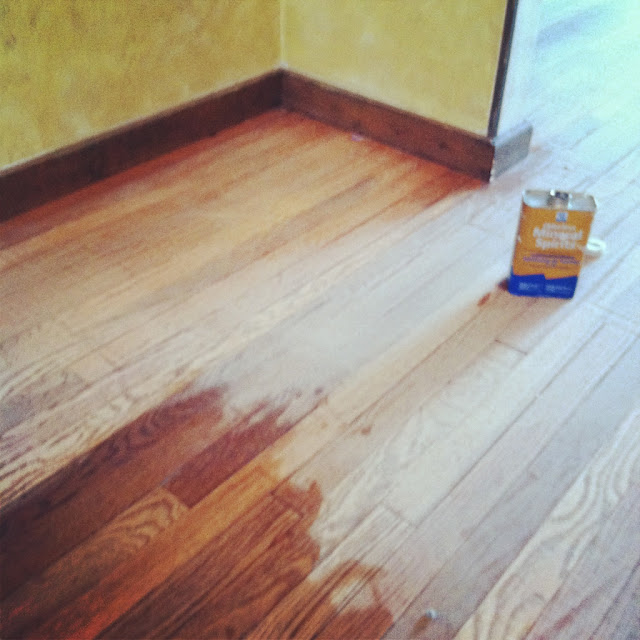
Now it's time to break out the Beast.  There are various sanders available.  There's the drum sander, which you really need to be careful with because it's very easy to let it stand in one spot too long sanding out an nice rounded groove in the floor; there is a disc sander that supposedly works very well, but doesn't get into the corners as close; and there is an oscillating sander with a rectangular shape that does get pretty close in to the edges.  My Beast was an oscillator.  I used a 60-grit paper first, sanding the entire floor.  Then I used the mineral spirits on a rag to wipe up the dust.  After that one sanding I liked how the floor looked, so I used a single 120-grit paper to smooth out the sanding marks, wiped the dust clean again.

Wanting to give some time for the air to settle before starting the poly-finish, I packed up the Beast and took it back to Home Depot.  Because I had it less than 4 hours it only cost $35 instead of $125 to have it overnight.
One more wipe down and I was ready to put on the polyurethane.  Clean is one of the keys here, even though I don't think that it's possible to get it clean enough.  Another key when working with oil-based products is ventilation.  I learned this with the first coat.  I was pretty loopy by the time I'd finished getting coat one done.  Put this down like you're painting, but you don't want to apply it too thick, just a nice even coat. 

Then wait...

... and wait...

and wait.  I really wasn't expecting it to take six hours to dry, but it did.  That might be in part to it being winter and the temperatures being colder, but I don't think so.  Plan for a long dry time!


Sunday morning I got up to a pretty dry floor.  This next part doesn't really take that long and is very beneficial.  Lightly sand the surface of the previous finish to knock down and bubbles or dust that might have settled the previous day.  Then carefully wipe up the dust with clean water-damp cloth.  Open the windows (lesson learned from the previous day) and lay down the second coat.

I did not return for a full six hours after putting down the second coat and it was dry to the touch.  But it wasn't hard, so no furniture yet.  I waited a full 24 hours for that!  Here's what the finished product looks like. 


By the way, we signed the paperwork last night.  This house is now on the market.  Say a prayer for a quick sale.  No, wait a minute, we don't have anywhere to move just yet!